Build a Risk Assessment
The following article provides step-by-step guidance on building a Risk Assessment in the Health & Safety Management system.
You can build a Risk Assessment from scratch, or you can copy out the details of your existing Risk Assessments into the system.
1. Click on Risk Assessments > New Assessment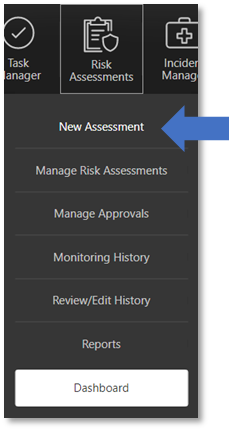
2. Select the Type of Risk Assessment you want to create.

This guide will show the process of building a General Health & Safety Risk Assessment, however there are other templates available for you to use such as:
- COSHH
- Fire
- General Health & Safety
- Manual Handling
- New and Expectant Mothers
- Stress Departmental
- Young Person
If you have already built a Risk Assessment template you can also select that from the list to work from.
You will also need to pick a Risk Matrix Type which is how you will measure the level of risk a hazard presents.

Your Risk Matrix will be either:
- High/Medium/Low
- 3x3
- 5x5
Click Create to continue.
3. Enter the Basic Details of your Risk Assessment.
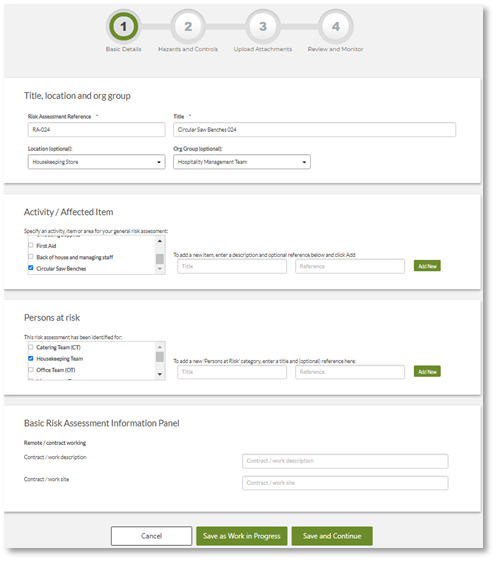
Fields with asterisks* are mandatory.
- Risk Assessment Reference*
Words or numbers to reference that specific Risk Assessment. The system will generate a unique reference automatically, or you can make up your own. - Title*
Give your Risk Assessment a unique title that clearly references what activities/hazards it addresses. - Location/Org Group
Allocate your Risk Assessment to a specific Location or Org Group (Department) in your company. You can set up your company locations and org groups in your Settings (top right corner). - Activity/Affected Item
Specify the general activity, item, or area that your Risk Assessment covers.
E.g., the task of ‘Operating circular saw benches’. - Persons at Risk
What groups of people are at risk due to the hazards covered in the Risk Assessment?
E.g., ‘Machine Operators’, ‘Employees’, ‘Customers’, or ‘Members of the Public’.
You can then specify the details of any contract work if applicable.
Then click Save and Continue, or click ‘Save as Work in Progress’.
( To find a work-in-progress Risk Assessment, go to Risk Assessments > Manage Risk Assessments and Edit.)
4. Select from a list of Hazards (if you want to).
The system will then show a list of suggested Hazards.Tick any of the hazards that apply to your Risk Assessment, or just click Continue and add your own at the next step.
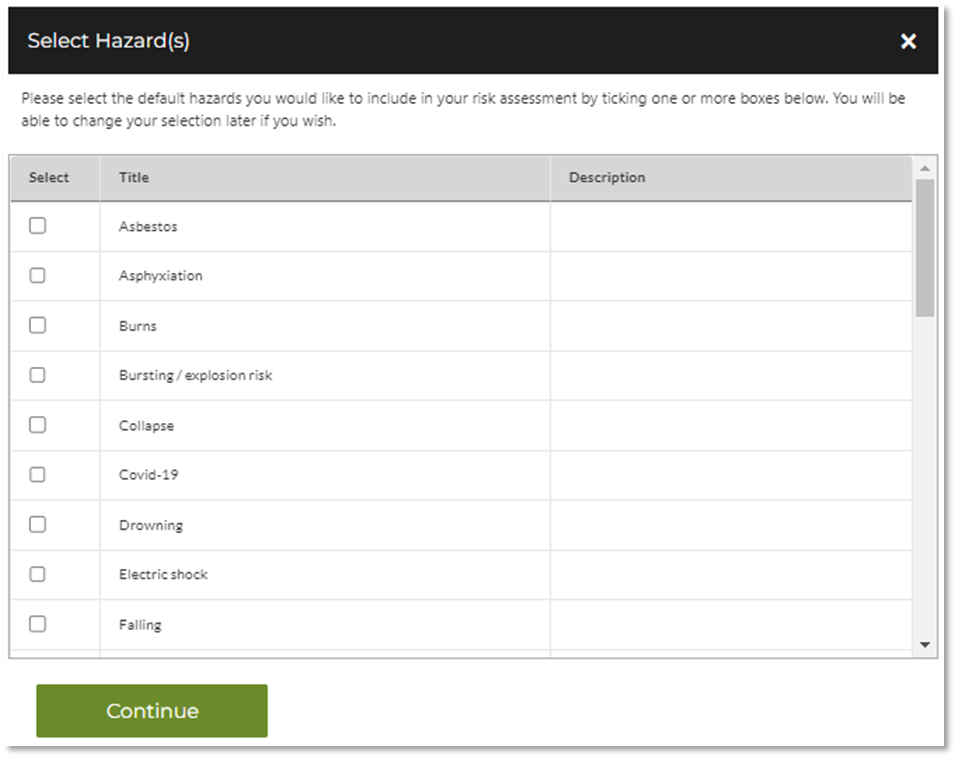
The advantage of selecting a hazard from this list is that the system will suggest control measures for you to put in place.
5. Add your Hazards, Risk scores, and Control Measures.
Click Add New Hazard and either select an existing Hazard from the list, or select 'Other' to type in your own.

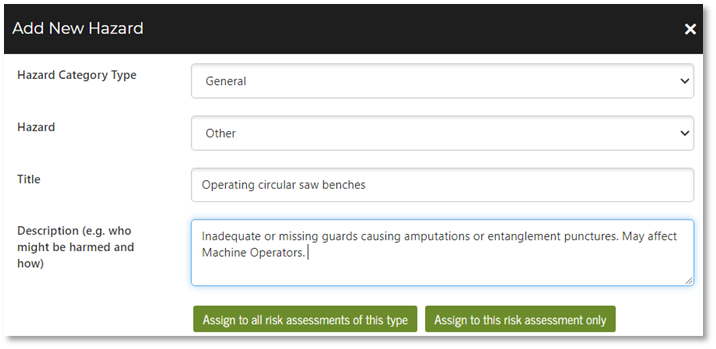
Then you can click Assign to this Risk Assessment Only.
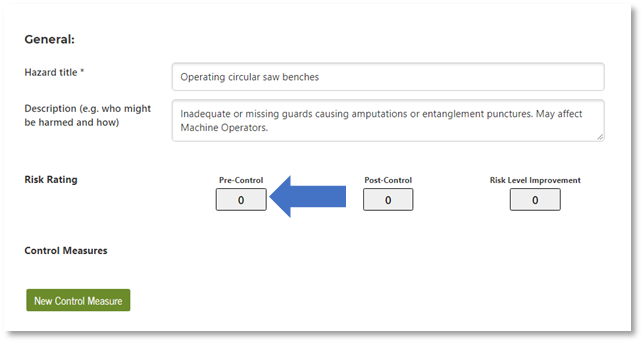
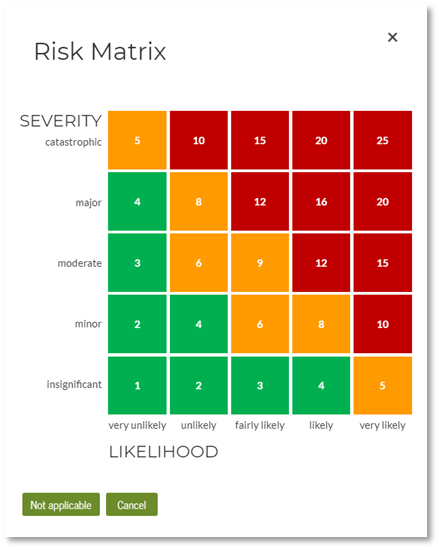
6. Add your Pre-Control Risk Score.
If you did nothing to address the hazard, what would be the likelihood of something going wrong? If something did go wrong how serious would it be?
7. Add your Control Measures
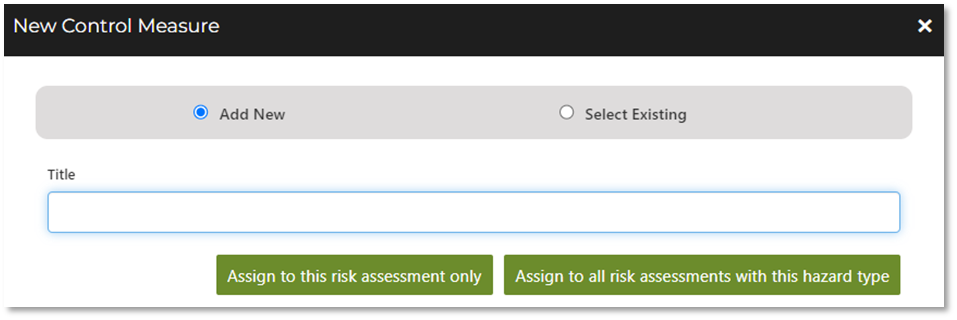
Click New Control Measure to add your Control Measures.

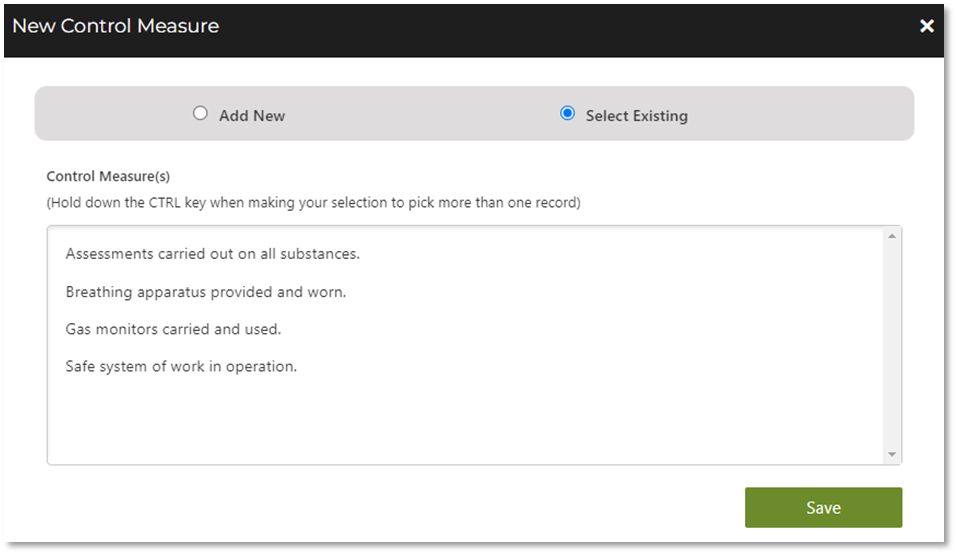
Type in your control measure in the 'Title' field. If you selected an existing hazard from the list, you can use the Select Existing option where you will be provided with a list of control measures you are welcome to use.
8. Add your Post-Control Risk Score.
Once you have applied your control measures, what is the level of risk now?
Mark the score by clicking on the Post-Control risk box and selecting your score on the Risk Matrix.
The system will then calculate the Risk Level Improvement score.
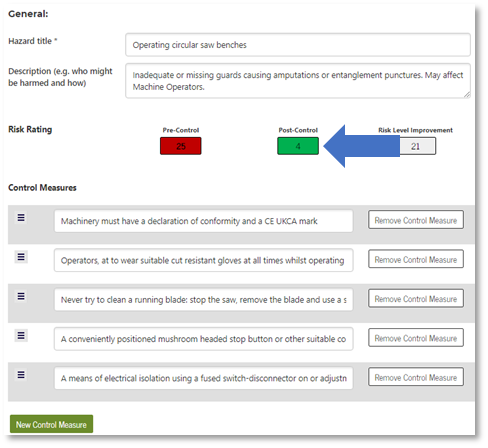
You can then continue to add new Hazards, Risk Scores, and Control Measures until the content of your risk assessment is complete.
Click Save and Continue when you are ready.
9. Add any Attachments
You will then be taken to a page where you can add any attachments to the hazards and control measures you've just written.
These could be photos, instructions, floor plans, data sheets, etc. These will then be available for anyone reading the finished Risk Assessment document.

Click the Attach symbol to attach documents that are already saved on your computer.

When you’re done, click Save and Continue.
10. Set the Monitoring and Reviewing schedules for the Risk Assessment.
Monitoring – this is when team member observes the current working environment or activity covered in the Risk Assessment, and records whether each of the control measures were being complied with. We might recommend scheduling monitoring on a semi regular basis such as weekly or monthly, depending on the Risk Assessment.
Reviewing – an employee/manager/Health & Safety Officer reads through the latest copy of the Risk Assessment and makes changes or updates as necessary. The can then leave comments on what changes they have made. Recommended on at least an annual basis or whenever there is a change to the working procedure/environment.
Use this page to set up how often the monitoring/reviewing has to be done, and who by. The employee you select will receive an email and a task notification when it is time to do the task.

If you do not want to set up a monitoring or reviewing schedule, just tick ‘Monitoring not required’ or ‘Review not required’. You can still Monitor and Review on an ad-hoc basis.
11. Click Save & Publish.
You will have the option to 'Monitor Risk Assessment Immediately'.
This will allow you to record how compliant you are with your Control Measures and set Further Actions to address these shortfalls.
If you have set up Monitoring or Review schedules, publishing the Risk Assessment this will make them go live. Email reminders will be sent to the assigned staff at the scheduled review and monitoring periods. The user will also receive a task notification in the system.
If you need any further guidance on Risk Assessments, and how to implement them using the system, please feel free to contact our helpdesk on 0800 879 99 81 or info@bcarm.co.uk , or you can book a demo with us at a time that suits you.
